

Supplies
3 tubes of choice – I used the wonderful artwork of Pin Up Toons which
can now be purchased from CDO. You must have
a license to use.
Font of choice - I used Androgyne here
Monti Circular Mask here
“Autumn Butterfly” is a tagger size scrap kit
created by Rissa of Rissa’s Designs and can be purchased from Twilight Scraps. You can visit her blog here.
Thank you Rissa for a terrific autumn kit.
Thank you Rissa for a terrific autumn kit.
This tutorial was written assuming you have a working knowledge of PSP.
~♥~ Let’s get started ~♥~
Open up a 700 x 700 blank canvas.
Flood fill white.
Copy and paste Frame 3 as a new layer.
Resize 80%
Click inside of each frame with your Magic Wand – be sure to click
inside the tiny areas of the vine as well.
Selections/Modify/Expand by 4.
New Raster layer below the frame.
Copy and paste Paper 5 Into Selection.
Do not deselect.
Copy and paste your first tube as a new layer positioning it below one
of the frames.
Selections/Invert
Tap the delete key.
If the tube can be seen within one of the other frames then deselect
and use your eraser tool to erase what you don’t want seen in the other frames.
Highlight the paper layer.
Click anywhere outside of it with your Magic Wand.
Copy and paste your next tube as a new layer and move into position
below another frame.
Tap the delete key.
Deselect and use your eraser tool to erase the tube if it’s showing up
in another frame.
Repeat the above step with the last empty frame.
Add your elements. I used:
Wreath: Resize 80%
Butterfly Bow: Resize 30%
Owl: Resize 35%
Birdhouse 2: Resize 80%
Butterfly 1: Resize 15%/Free
rotate Right 25 degrees/Duplicate/Mirror/Resize 70%
Highlight your white background.
New Raster layer.
Select All.
Copy and paste Paper 3 Into Selection.
Deselect.
Adjust/Blur/Gaussian Blur:
Radius: 10%
OK
Apply the mask.
Resize 80%
Merge Group.
Crop your image slightly.
Add your credits.
Add your name.
Color Pallet:
Foreground: #2d0400
Background: Pattern/Paper 5
Stroke: 1.0
Type your name.
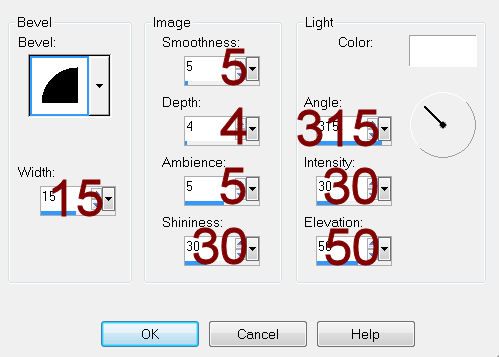
Give it a slight Inner Bevel:
Give your name a drop shadow on its own layer.
Use your Pick Tool and squash the drop shadow and move
that to the bottom of the shadow lines up with the bottom of your name.
that to the bottom of the shadow lines up with the bottom of your name.
Copy and paste Caterpillar as a new layer.
Resize 10%
Adorn your name with the little guy.
Resize all layers 80%.
No comments:
Post a Comment