

Supplies
1 tube of choice – I used the beautiful artwork of Natacha Chohra which
can be purchased from PSP Tube Stop. You must have
a license to use.
Font of choice - I used Quickier here
Plug Ins used:
DSB Flux – Bright Noise
“It’s Thanksgiving” is
a tagger size scrap kit created by Karen of Sweet Occasion Designs and can be purchased
from Lollipopsn Gumdrops. You can visit her blog here.
Thank you Karen for a really festive kit.
Thank you Karen for a really festive kit.
This tutorial was written assuming you have a working knowledge of PSP.
~♥~ Let’s get started ~♥~
Open up a 700 x 700 blank canvas.
Flood fill white.
Copy and paste Pumpkin Frame 2 as a new layer.
Resize 95%
Click inside of it with your Magic Wand.
Selections/Modify/Expand by 4.
New Raster layer below the frame.
Copy and paste Paper 5 Into Selection.
Deselect.
Copy and paste your tube as a new layer.
Position it in front of the pumpkin but to the left – see my tag for
reference.
New Raster layer below your tube layer.
Make your Selection Tool active set on Rectangle.
Create a rectangle approximately 200 x 500 pixels.
Flood fill with #1f140b
Selections/Modify/Contract by 3
New Raster layer.
Copy and paste Fabric Papers 17_Paper 2 Into Selection
Copy and paste your tube as a new layer and position over the paper.
Selections/Invert
Tap the delete key.
Deselect.
Change the Properties of the tube to Soft Light.
New Raster layer just above the tube you changed to Soft Light.
Make your Selection Tool active again set on Rectangle.
Create a rectangle approximately 150 x 450 pixels.
Copy and paste Cajoline_papiermandarinecu_3 Into Selection.
DO NOT DESELECT.
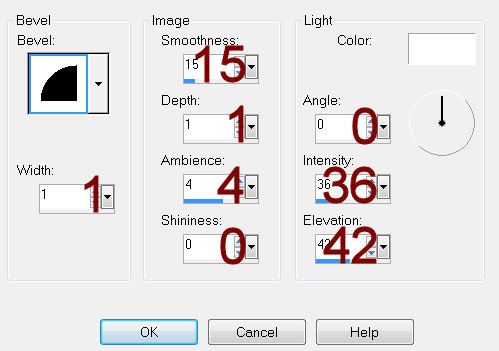
Give it a slight Inner Bevel:
Highlight the tube that you changed to Soft Light.
In your layers pallet right click/Promote Section to layer.
In your layers pallet move this promoted layer just above the paper you
just pasted into that thin rectangular section.
Deselect.
Change the Properties of the promoted layer to Multiply.
Add your elements. I used:
WishingonaStarr_CU4CU_Great outdoors009: Resize 85%
Greenery 1: Resize
30%/Duplicate/Flip
Flower 06: Resize 35%
Highlight your white background.
New Raster layer.
Select All.
Copy and paste Fabric Papers 17_Paper5_Scrap and Tubes Into Selection.
Apply the mask.
Merge Group.
Add your credits.
Add your name.
Color Pallet:
Foreground & Background: #1f140b
Type your name.
Convert to Raster layer.
Resize all layers 80%.
No comments:
Post a Comment