

Supplies
1 tube of choice – I used the wonderful artwork of Michael Calandra
which can now be purchased from CDO. You must have a license to
use.
Font of choice - I used Ringbearer medium here
Weescotlass Mask 236 here
Plug Ins used:
Greg’s Factory Output Vol. II – Pool Shadow
Eyecandy 5: Nature - Fire
Animation Shop
“Moon Rising” is a tagger size scrap kit created by Jessica of Gothic
Inspirations and can be purchased from her store Gothic Inspirations. You can visit her blog here.
Thank you so much Jess for another STUNNING kit!
This tutorial was written assuming you have a working knowledge of PSP.
~♥~ Let’s get started ~♥~
While making this tag I found I had to make my canvas bigger so the
start up size will be a bit larger. Also
in this tutorial you may need to make your own adjustments as to resizing of
the elements.
Open up a 700 x 725 canvas.
Flood fill white.
Open up Mask element from the kit.
Make your Selection Tool active set on Rectangle and section out the
entire middle of the mask.
Copy
Paste as new Image.
Color Pallet:
Foreground: #000000
Background: Pattern/Look for your new image.
Angle: Scale 100
Make your Text Tool active.
Stroke set on 1.0
Type your name across your canvas – see my tag for reference.
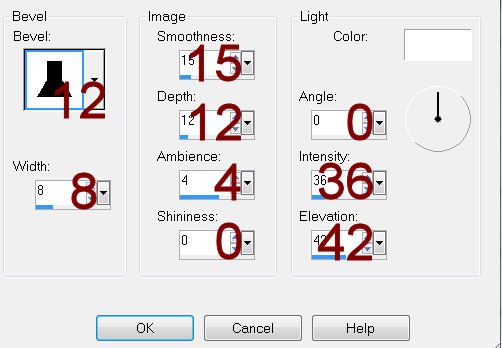
Give it a slight Inner bevel 2x’s:
Copy and paste Frame 5 as a new layer.
Make your Pick Tool active.
You’re going to use this tool to shape the frame around your name by
pulling the corner and top and/or bottom in.
Be sure to leave a bit of breathing room around your name though – see
my tag for reference.
Once the fame is fitted around your name, Click inside of it with your
Magic Wand.
Selections/Modify/Expand by 6.
New Raster layer below the frame.
Copy and paste Paper 1 Into Selection.
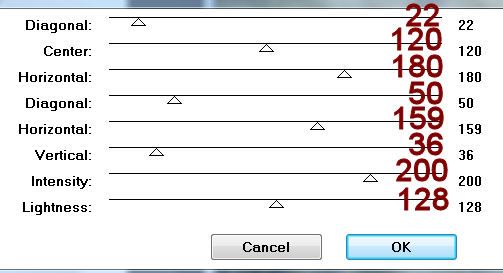
Apply Greg’s Factory Output Vol. II – Pool Shadow 2x’s:
Copy and paste Rocks as a new layer above the paper.
Change the Properties to Color.
Selections/Invert
Tap the delete key.
Deselect.
Close out your white background.
Merge Visible.
Reopen your white background.
Copy and paste your tube as a new layer.
Move both the tube and merged layer into position – see my tag for
reference.
Copy and paste Bling 1 as a new layer.
Move into position – see my tag for reference.
Make your Ellipse Tool active set on Draw Circle.
Create a circle beneath the bling – the circle should only go as far as
the center of the bling edges.
New Raster layer.
Copy and paste Paper 9 Into Selection.
New Raster layer.
Copy and paste Paper 9 Into Selection.
Be sure it’s centered behind the bling – Convert to Raster layer.
Click anywhere outside of the paper circle with your Magic Wand.
Selections/Modify/Inside Outside Feather:
Both checked
Feather amount: 30
OK
Tap your delete key until you have a nice feathered look to the paper.
Deselect.
Add your elements over the circle paper layer. I used:
(You may need to make adjustments to size depending on how large you
made your circle)
Tree 2
Moon: Resize 25%
Cloud
Merge Visible the Tree, Moon, and Cloud.
Highlight the circle paper layer.
Click anywhere outside of it with your Magic Wand.
Selections/Modify/Inside Outside Feather:
Use same settings.
Tap your delete key until you have a nice feathered look to the
elements.
Deselect.
Add the rest of your elements. I
used:
Crow: Resize 45%. I wanted it darker so I duplicated/change
Properties to Soft Light.
Leaves Doodles: Resize 80%/Free
rotate Left 80 degrees
Candle Sticks: Resize 40%
Highlight the background layer.
Select All.
Copy and paste Paper 5 Into Selection.
Deselect.
Apply the mask.
Resize 90%
Merge Group.
Move into position behind the Merged paper and elements layer.
Duplicate the Candle Sticks layer.
Close out the original.
Highlight the copy.
Make your Freehand Selection Tool active set on Point to Point or
Freehand – whichever you feel more comfortable using and trace around each
flame.
Tap the delete key.
Deselect.
Use your Eraser Tool and erase any remnant of flames.
Duplicate 2x’s for a total of 3 candle layers.
Rename them Candle 1, Candle 2, and Candle 3.
Open up the original - you’re
only using this for a template.
Make your Freehand Selection Tool active again and trace around each
flame.
Delete this candle layer.
Highlight Candle 1 layer.
Apply Eyecandy 5: Fire – Nature:
On the Settings tab choose Small,
Candle.
On the Basic tab match your settings to mine:
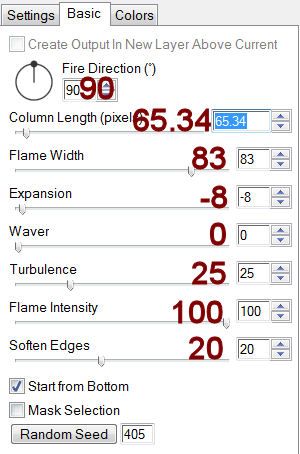
Keep default colors on the Colors Tab.
Click the Random Seed button until you have a flame you like.
OK
Highlight Candle 2 layer.
Repeat the above step accept hit the Random Seed button to find another
flame you like.
Highlight Candle 3 layer.
Repeat the above step.
Deselect.
Close out Candle 2 and Candle 3 layer.
Leave ppen Candle 1 layer.
Add your copyrights.
Resize all layers 75%
Copy Merge.
~ Time to Animate ~
Open up Animation Shop.
Edit/Paste As New Animation.
Back in PSP.
Close out Candle 1.
Open up Candle 2.
Copy Merge.
Carry Into AS.
Edit/Paste/After Current Frame.
Back in PSP.
Close out Candle 2.
Open up Candle 3.
Copy Merge.
Carry Into AS.
Edit/Paste/After Current Frame.
Highlight the first frame.
Ctrl + A
Animation/Frame Properties:
Change the Display Time to 22.
OK
View your animation.
If you’re happy with your tag then save.
No comments:
Post a Comment