

Supplies
1 tube and 1 image of choice – I used the wonderful artwork of Lisa
Cree which can now be purchased from her tube store PSP TubeStop. You must have a license to use.
Font of choice - I used Charming here
Designs by Vaybs Mask 2 here
Creative by Nature template 37 here
Plug Ins used:
Greg’s Factory Output Vol. II – Pool Shadow
“Black Soul” is a tagger size scrap kit
created by Conchi of DnScraps and can be purchased from Lollipopsn Gumdrops. You can visit her blog here.
Thank you Conchi for a really wonderful kit.
Thank you Conchi for a really wonderful kit.
This tutorial was written assuming you have a working knowledge of PSP.
~♥~ Let’s get started ~♥~
Open up the template.
Shift + D.
Close out the original.
Image/Canvas Size:
650 x 650
Open up Raster 1 layer and flood fill white.
Delete the top 7 layers.
Highlight Raster 2 layer.
Click on it with your Magic Wand.
New Raster layer.
Copy and paste Paper 4 Into Selection.
Apply Greg’s Factory Output Vol. II – Pool Shadow:
Use default settings.
Deselect.
Delete the template layer.
Highlight Raster 3 layer.
Click anywhere outside of it with your Magic Wand.
Selections/Invert
New Raster layer.
Copy and paste Paper 3 Into Selection.
Adjust/Add Remove Noise/Add Noise:
Uniform checked
Noise: 35%
OK
Deselect.
Delete the template layer.
Repeat the above step with Raster 5 layer.
Highlight Copy of Vector 1 layer (big pink oval layer)
Click on the plain pink color of it with your Magic Wand.
Selections/Invert
New Raster layer.
Copy and paste Paper 12 Into Selection.
Copy and paste your image as a new layer above the paper layer.
Selections/Invert
Tap the delete key.
Change the Properties to Soft Light.
Selections/Modify/Inside Outside Feather
Both checked
Feather amount: 36%
OK
Tap the delete key until you have a nice feathered effect to the image.
Deselect.
Delete the template layer.
Highlight Copy of Vector 1 layer (small pink circle)
Click on it with your Magic Wand.
New Raster layer.
Copy and paste Paper 4 Into Selection.
Copy and paste Angels 2 as a new layer over the paper layer.
Resize 60%
Selections/Invert
Tap the delete key.
Deselect.
Change the Properties to Soft Light.
Delete the template layer.
Highlight Raster 6 layer.
Click on it with your Magic Wand.
New Raster layer.
Copy and paste Paper 4 Into Selection.
New Raster layer.
Copy and patse Paper 2 Into Selection.
Change the Properties to Exclusion and lower the Opacity to about 22.
Deselect.
Delete the template layer.
Copy and paste Arch as a new layer.
Resize 60%
Use your Pick Tool and pull the bottom of the arch down to line up with
the bottom of the paper.
Copy and paste Ball 2 as a new layer.
Copy and paste your tube as a new layer over the crystal ball.
Make your Freehand Selection Tool active set on Point to Point and
section off the crystal ball portion:
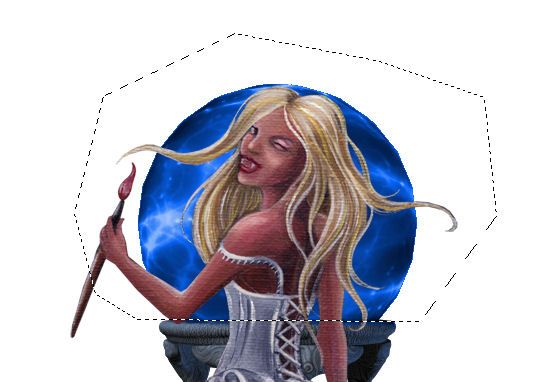
Selections/Invert
Tap the delete key.
Highlight the crystal ball layer.
Click anywhere outside of it with your Magic Wand.
Highlight the tube layer.
Tap the delete key.
Deselect.
Change the Properties to Soft Light.
Merge Down.
Resize 45%
Move into position – see my tag for reference.
Copy and paste your tube as a new layer.
Add your elements. I used:
Spider: Resize 70%
Goth Cross: Resize 50%
Horns: Resize 55%
Frame 3: Resize 70%
Highlight your white background.
New Raster layer.
Select All.
Copy and paste Paper 1 Into Selection.
Deselect.
Apply the mask.
Resize 110%
Merge Group.
Add your credits.
Add your name.
Color Pallet:
Foreground: #000000
Background: #202020
Stroke: 1.0
Type your name.
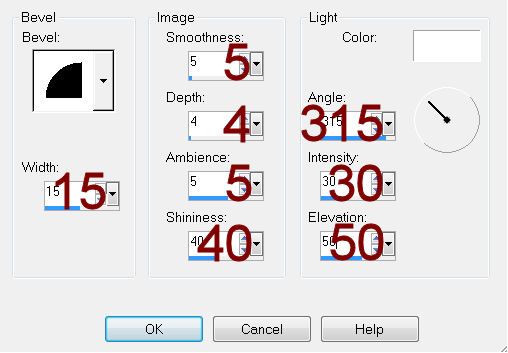
Give it a slight Inner Bevel:
Resize all layers 80%.
No comments:
Post a Comment