

Supplies
1 tube of choice – I used the beautiful artwork of Renee Biertempfel
which can be purchased from CDO. You must have
a license to use.
Font of choice – I used Centeria Script here
Weescotlass Mask 208 here
“Punkin Pickin’ Time” is a tagger size scrap kit created by me, Bev of
HorsePlay’s Pasture Designs and can be purchased from either of your favorite stores – Lollipops n Gumdrops or Butterfly Blush Designs or Inspirations of Scrap Friends. You can visit
my designing blog here.
~♥~ Let’s get started ~♥~
Open up a 700 x 700 blank canvas.
Flood fill white.
Copy and paste 80 as a new layer.
Resize 80%
Click inside of it with your Magic Wand.
Selections/Modify/Expand by 4.
New Raster layer below the frame.
Copy and paste Paper 12 Into Selection.
Copy and paste your tube as a new layer just above the paper layer.
Selections/Invert
Tap the delete key.
Lower the Opacity of the tube to about 22.
Deselect for now.
Copy and paste 64 as a new layer below the frame.
Resize 70%
Duplicate/Mirror
Move both element layers into position – see my tag for reference.
Highlight the paper layer.
Click anywhere outside of it with your Magic Wand
Highlight each element layer and tap the delete key.
Deselect.
Close out your white background.
Merge Visible.
Reopen your white background.
Copy and paste 78 as a new layer.
Resize 70%
Free rotate Right 90 degrees
Move into position behind the merged layer – see my tag for reference.
Duplicate
Mirror
To each frame:
Click inside of it with your Magic Wand.
Selections/Modify/Expand by 4.
New Raster layer below the frame.
Copy and paste Paper 11 Into Selection.
Deselect.
Copy and paste 63 as a new layer below the left frame.
Resize 25%
Move into position – see my tag for reference.
Duplicate
Mirror
Position below the right frame.
Copy and paste your tube as a new layer.
Add your elements. I used:
15: Resize 60%
29: Resize 25%/Duplicate/Mirror
27: Resize 25%/Duplicate/Mirror
2: Resize 25%
25: Resize 25% and 70%/Free
rotate Left 25 degrees
8: Resize 25%
9: Resize
20%/Flip/Duplicate/Mirror
33: Resize 30%
34: Resize 25%/Duplicate
32: Resize 20%/Free Rotate Left
90 degrees
51: Resize
15%/Flip/Duplicate/Mirror
50: Resize 15%/Duplicate/Flip
1: Resize 30% and 90%
37: Resize 10%
Highlight your white background.
New Raster layer.
Select All.
Copy and paste Paper 3 Into Selection.
Deselect.
Apply the mask.
Merge Group.
Crop you image.
Add your credits.
Add your name.
Foreground: #7f470d
Background: #fcdb2e
Stroke: 1.25
Type your name.
Give it a slight Inner Bevel:
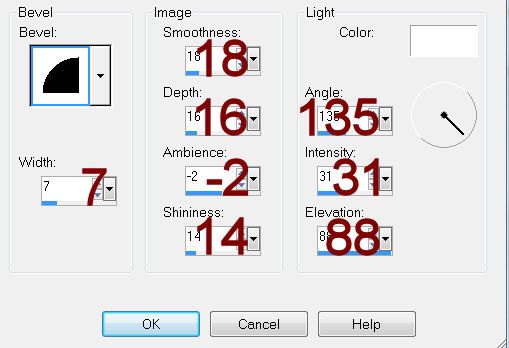
Resize all layers 80%.
No comments:
Post a Comment