

Supplies
1 tube of choice – I used the artwork of Anna Marine which can be
purchased from CDO. You must have a license to
use.
Font of choice – I used Great Vibes – I’m sorry I couldn’t find a link
Weescotlass Mask 208 here
Essence of Creativity Template 18 here
Her blog has been deleted so I uploaded to share with all her credit
intact.
Plug Ins used:
Mura’s Meister – Copies
Greg’s Factory Output Vol II – Pool Shadow
“Holly Jolly Christmas” is a tagger size scrap kit created by Michelle
of Pink Popcorn Designs and can be purchased from Heartbeatz
Creationz. You can visit her
designing blog here. Thank you Michelle for a
really beautiful kit.
~♥~ Let’s get started ~♥~
Open up the template.
Shift + D.
Close out the original.
Delete the credit layer.
Image/Canvas Size:
650 x 550
OK
Color Pallet:
Foreground: #202020
Background: #2f5b38
Highlight Dotted Line template layer.
Make your Color Replacer Tool active.
Change the color of the template layer.
Highlight Large Circle layer.
Click on it with your Magic Wand.
New Raster layer.
Copy and paste Paper 13 Into Selection.
Deselect.
DO NOT delete the template layer.
Give the paper layer a slight inner Bevel:
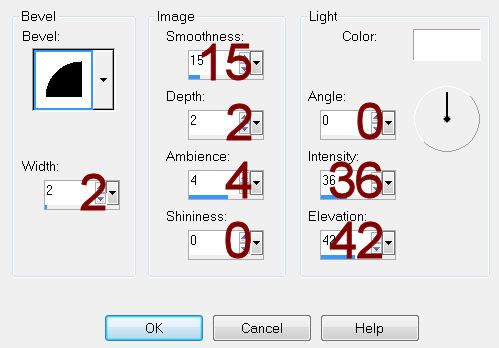
Highlight Small Circle layer.
Repeat the above step.
Highlight Small Rectangle layer.
Merge down.
Both rectangles should be on the same layer.
Click on both of them with your Magic Wand.
New Raster layer.
Copy and paste Paper 4 Into Selection.
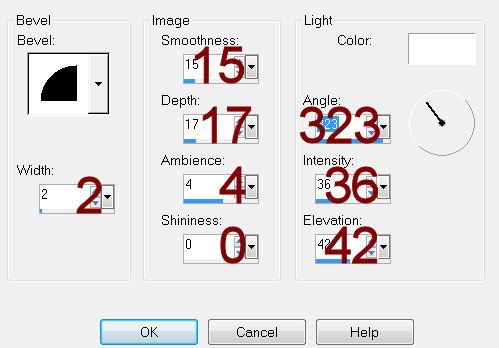
Give it the same slight Inner Bevel.
Apply Greg’s Factory Output Vol. II – Pool Shadow:
Use default settings accept lower the Intensity bar down to about 53.
OK
Copy and paste your tube as a new layer over the larger rectangle – see
my tag for reference. It’s alright if
some of the tube is on the smaller rectangle.
Change the Properties to Soft Light.
Selections/Invert
Tap the delete key.
Deselect.
Delete the template layer.
Highlight Long Rectangle layer.
Click anywhere outside of it with your Magic Wand.
Copy and paste Paper 7 as a new layer.
Resize 85%
Tap the delete key.
Deselect.
Delete the template layer.
Copy and paste Element 134 as a new layer.
Resize 10% and 90%
Apply Mura’s Meister – Copies:
Set on Encircle – change Number to 17
OK
Edit/Copy
Delete the ring of flowers you just made.
Highlight Large Circle template layer.
Click on it.
New Raster layer just above the Large Circle paper layer.
Edit/Paste Into Selection.
Deselect.
Resize 95%
Copy and paste your tube as a new layer.
Add your elements. I used:
106: Resize 60%
141: Resize 70%
95: Resize 20%/Duplicate 2x’s
145: Resize 70% and 95%
145 again: Resize 35%
107: Resize 25%
90 & 91: Resize 70%
10: Resize 10%/Free rotate Right
25 degrees/Duplicate/Mirror
164: Resize 35% - place behind
the small circle paper
164 again: Resize 25%/Duplicate
2x’s/Duplicate and mirror all 3 layers
Highlight your white background.
New Raster layer.
Select All.
Copy and paste Paper 10 Into Selection.
Deselect.
Apply the mask.
Use your Pick Tool and pull the right side out just a little.
Merge Group.
Add your credits.
Add your name.
Foreground: #000000
Background: Pattern/Paper 1
Stroke 1.
Type your name.
Give it a slight Inner Bevel:
Resize all layers 80%.
No comments:
Post a Comment