

Supplies
1 tube of choice – I used the artwork of Archie Dickens which can be
purchased from CDO. You must have a license to
use.
Font of choice – I used Unbalanced here
Weescotlass Mask 208 here
My Template 141 here
Plug Ins used:
DSB Flux – Bright Noise
“Thanksgiving” is a tagger size scrap kit created by Joy of Mystic
Creations and can be purchased from ExquisiteScraps. You can visit her blog here.
Thank you Joy for a really wonderful kit.
~♥~ Let’s get started ~♥~
Open up the template.
Shift + D.
Close out the original.
Delete the credit layer.
Image/Canvas Size:
700 x 700
OK
Highlight the background layer.
Flood fill white.
Highlight Rectangle 1 layer.
Click on it with your Magic Wand.
New Raster layer.
Copy and paste Paper 1 Into Selection.
Duplicate
Effects/Texture Effects/Mosaic Antique:
Use Default Settings.
Merge Down.
Deselect.
Delete the template layer.
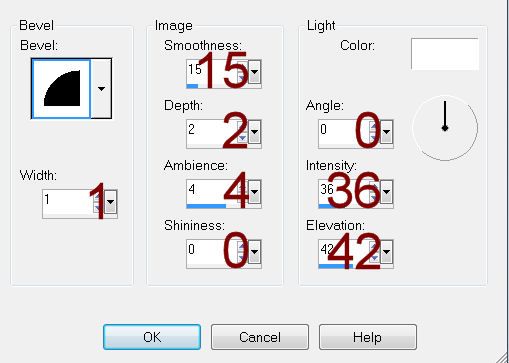
Give it a slight Inner Bevel.
Give it a slight Inner Bevel.
Highlight Rectanlge 2 layer.
Repeat the above step.
Highlight Glitter Circle 1 layer.
Click anywhere outside of it with your Magic Wand.
Selections/Invert
New Raster layer.
Flood fill with #1c0000
Adjust/Add Remove Noise/Add Noise:
Uniform and Monochrome checked
Noise: 77%
OK
Deselect.
Delete the template layer.
Highlight Glitter Circle 2 layer.
Repeat the above step.
Color Pallet:
Foreground: #ffc0ff
Background: #1c0000
Highlight Dotted Circle layer.
Make your Color Replacer Tool active and change the color of template.
Color Pallet:
Change your foreground color to #404040
Highlight Dotted Line 1 layer.
Using your Color Replacer Tool again, change the color of the template
layer.
Highlight Dotted Line 2 layer.
Repeat the above step.
Highlight Strip 1 layer.
Click on it with your Magic Wand.
New Raster layer.
Flood fill with #5b7f46.
Apply DSB Flux – Bright Noise:
Intensity: 5
Mix checked
OK
Deselect.
Delete the template layer.
Give it the same slight Inner Bevel.
Highlight Strip 2 layer.
Repeat the above step.
Highlight Circle 1 layer.
Click on it with your Magic Wand.
New Raster layer.
Copy and paste Paper 13 Into Selection.
Deselect.
Delete the template layer.
Highlight Circle 2 layer.
Click anywhere outside of it with your Magic Wand.
Copy and paste Paper 12 as a new layer.
Resize 80%
Tap the delete key.
Copy and paste your tube as a new layer.
Resize to make your tube larger.
Change the Properties to Soft Light.
Move into position over the paper layer.
Tap the delete key.
Deselect.
Delete the template layer.
Copy and paste your tube as a new layer.
Add your elements. I used:
Leaf Scatter: Duplicate
Border 1: Resize 40%/Duplicate/Erase
what overlaps/Merge Down/Duplicate
Satin Bow 2: Resize 30%
Sunflower 1: Resize 25%/Duplicate
Beaded Swirl 2: Resize
60%/Duplicate 2x’s
Lilly 1: Resize 60%/Duplicate
Pumpkin 1: Resize 35%/Duplicate/Resize
70%
Butterfly 2: Resize 25%/Free
rotate Left 25 degrees
Autumn leaf 2: Resize
40%/Flip/Duplicate/Duplicate/Mirror
Highlight your white background.
New Raster layer.
Select All.
Copy and paste Paper 15 Into Selection.
Deselect.
Adjust/Blur/Gaussian Blur:
20
OK
Apply the mask.
Resize 110%
Merge Group.
Add your credits.
Add your name.
Resize all layers 80%.
No comments:
Post a Comment