

Supplies
3 tubes of choice – I used the amazing artwork of Zindy S. D. Nielsen which
can be purchased from her shop here. You must have a license to
use.
Font of choice – I used Aquarelle
here
Monti Circular Mask here
Tywsted T’s Playroom Template 40 here
“Blue for You” is a tagger size scrap kit created by Jane of JT’s
Designs and can be purchased from Lollipopsn Gumdrops.
Thank you Jane for an amazingly beautiful kit.
~♥~ Let’s get started ~♥~
Open up the template.
Shift + D.
Close out the original.
Resize all layers 80%
Image/Canvas Size:
700 x 500
OK
Open Raster 1 layer.
Flood fill white.
Delete the top layer.
Highlight Raster 8 layer.
Click on both shapes with your Magic Wand.
New Raster layer.
Copy and paste Paper 2 Into Selection.
Deselect.
Delete the template layer.
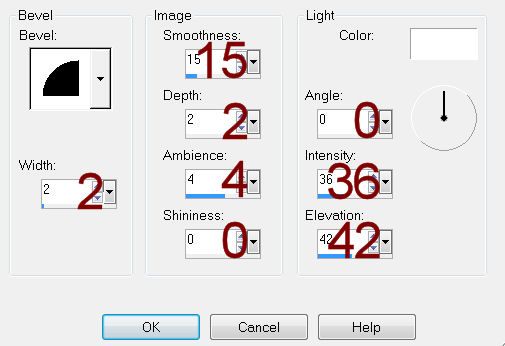
Give it a slight Inner Bevel:
Highlight Raster 2 layer.
Click on it with your Magic Wand.
New Raster layer.
Copy and paste Paper 8 Into Selection.
Deselect.
Delete the template layer.
Give it the same slight Inner Bevel.
Highlight Raster 7 layer.
Click on it with your Magic Wand.
New Raster layer.
Copy and paste Paper 7 Into Selection.
Deselect.
Delete the template layer.
Highlight Raster 11 layer.
Select All/Float/Defloat
New Raster layer.
Copy and paste Paper 2 Into Selection.
Adjust/Add Remove Noise/Add Noise:
Uniform and Monochrome checked
Noise: 55%
OK
Deselect.
Delete the template layer.
Repeat the above step with:
Raster 10 and Raster 9
Highlight Raster 3 layer.
Click on it with your Magic Wand.
New Raster layer.
Copy and paste Paper 3 Into Selection.
Copy and paste your tube as a new layer over the paper layer – Position
it over the left rectangle.
Selections/Invert
Tap the delete key.
Deselect.
Delete the template layer.
Change the Properties of the tube layer to Luminance.
Highlight Raster 4 layer.
Click on it with your Magic Wand.
New Raster layer.
Copy and paste Paper 4 Into Selection.
New Raster layer.
Copy and paste Element 30 Into Selection.
New Raster layer.
Copy and paste Element 30 Into Selection.
Deselect.
Delete the template layer.
Highlight Copy of Raster 4 layer.
Click on it with your Magic Wand.
New Raster layer.
Copy and paste Paper 4 Into Selection.
Copy and paste your tube as a new layer – move into position (see my
tag for reference)
Selections/Invert
Tap the delete key.
Deselect.
Delete the template layer.
Highlight Raster 5 layer.
Click on it with your Magic Wand.
New Raster layer.
Copy and paste Paper 4 Into Selection.
Copy and paste your tube as a new layer – move into position (see my
tag for reference)
Selections/Invert
Use your Eraser Tool to erase the area of the tube you don’t want to
overhang the circle paper.
Deselect.
Delete the template layer.
Add your elements. I used:
48: Resize 65%/Duplicate/Resize
70%
14b: Resize 35%
31: Resize 40% and 98%
24: Resize 80%/Duplicate
5: Resize 75%
17: Resize 25%/Mirror/Duplicate/Mirror/Flip
12: Resize 25%
6: Resize 30%
Crop your image.
Highlight your white background layer.
New Raster layer.
Select All.
Copy and paste Paper 6 Into Selection.
Deselect.
Apply the mask.
Merge Group.
Duplicate
Highlight your white background layer.
New Raster layer.
Select All.
Copy and paste Paper 6 Into Selection.
Deselect.
Apply the mask.
Merge Group.
Duplicate
Add your credits.
Add your name:
Foreground and Background: #101010
Stroke: .50
Type your name.
Convert to Raster layer.
Resize all layers 80%.
No comments:
Post a Comment