

Supplies
1 tube of choice – I used the artwork of Alex Prihodko which can be
purchased from Pics for Design. You must have
a license to use.
Font of choice – I used Kiss Me
Quick here
Gem Mask 44 here
Tywzted T’s Playroom Hearts on Ice Blog Train here
Can be found under February 5, 2013 –
Use Hearts on Ice Template 4 for this tutorial.
Plug Ins used:
Brush Strokes - Crosshatch
“Tweens” is a tagger size scrap
kit created by Lorraine of Artlor’s Designs and can be purchased from Lollipops n Gumdrops. You can visit her blog here. Thank you Lorraine for a fabulous kit!
~♥~ Let’s get started ~♥~
Open up the template.
Shift + D.
Close out the original.
Resize all layers 85%
Image/Canvas size:
700 x 500
OK
Open up Raster 1 layer.
Flood fill white.
Delete the credit layer, Raster 5, and Copy of Raster 5 layer.
Copy and paste Frame 9 as a new layer at the top of your layers pallet.
Resize 45%
Click inside of it with your Magic Wand.
Selections/Modify/Expand by 4.
New Raster layer below the frame.
Copy and paste Paper 8 Into Selection.
Deselect.
Highlight the frame layer.
Merge Down.
The frame and paper should now be on the same layer.
Duplicate
Move both merged layers into position – see my tag for reference.
Highlight Raster 7 layer.
Click on it with your Magic Wand.
New Raster layer.
Copy and paste Paper 10 Into Selection.
Apply Brush Strokes – Crosshatch:
Stroke Length: 27
Sharpness: 6
Length: 1
OK
Deselect
Delete the template layer.
Highlight Raster8 layer.
Select All/Float/Defloat.
New Raster layer.
Copy and paste Paper 13 Into Selection.
Adjust/Add Remove Noise/Add Noise:
Gaussian and Monochrome checked
Noise: 55%
OK
Deselect.
Delete the template layer.
Repeat the above step with:
Raster 3 and Raster 4 layers.
Highlight Raster 9 layer.
Select All/Float/Defloat.
New Raster layer.
Copy and paste Paper 2 Into Selection.
Apply the same Noise Effect.
Deselect.
Delete the template layer.
Highlight Raster 7 layer.
Click on both rectangles with your Magic Wand.
New Raster layer.
Paste Paper 2 Into Selection.
Copy and paste your tube as a new layer.
Move into a position you like.
Change the Properties to Soft Light.
Selections/Invert
Tap the delete key.
Deselect.
Delete the template layer.
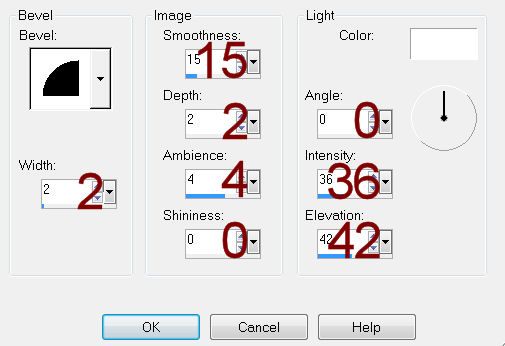
Give the paper a slight Inner Bevel:
Highlight Copy of Raster 2 layer.
Click on it with your Magic Wand.
New Raster layer.
Copy and paste Paper 2 Into Selection.
Deselect.
Delete the template layer.
Add your elements. I used:
Tag 2 and 3: Resize 70%/Flip
Swans: Resize 50%
Star Chain 1: Resize 40%
Flower Bouquet 3: Resize 50%/Duplicate/Resize
90%
Flower 3: Resize 25%
Flower 2: Resize 20%/Duplicate
Butterfly 1: Resize 20%/Free
rotate Right 25 degrees/Duplicate/Resize 70%/Mirror
Highlight your white background.
New Raster layer.
Select All.
Copy and paste Paper 2 Into Selection.
Deselect.
Apply the mask.
Merge Group.
Resize 80% - Position near the top left of your canvas.
Duplicate/Mirror/Merge Down.
Duplicate/Flip
Merge Visible both mask layers.
Resize 95%
Add your credits.
Add your name:
Color Pallet:
Foreground: Null
Background: #000000
Type your name.
Convert to Raster layer.
Resize all layers 80%.
No comments:
Post a Comment