

Supplies
1 tube of choice – I used the artwork of Sandlady and can be purchased
from Pics for Design. You must generate a license to use.
Vix Mask 451 here
Plug Ins used:
DSB Flux – Bright Noise
“Cottontail’s Trail” is a tagger size scrap kit created by me, Bev of HorsePlay’s
Pasture Designs and can be purchased from either of my stores, Scraps from the Heart, Butterfly Blush or Heartbeatz Creationz. You can visit my designing
blog here.
~♥~ Let’s get started ~♥~
Open up a 750 x 700 blank canvas.
Flood fill white.
Copy and paste Element 22 as a new layer.
Click inside of each rectangle with your Magic Wand.
Selections/Modify/Expand by 2.
New Raster layer below the frame.
Copy and paste Paper 11 Into Selection.
Copy and paste 25 as a new layer below the frame.
Move into position – see my tag for reference.
Selections/Invert
Tap the delete key.
Copy and paste Element 8 as a new layer.
Resize 50%
Position within the center rectangle.
Copy and paste Element 11 as a new layer below the frame.
Resize 50%
Position within the right rectangle – see my tag for reference.
Tap the delete key.
Deselect.
Copy and paste your tube as a new layer.
Position in front of the left side of the frame – see my tag for reference.
Color Pallet:
Foreground: Null
Background: #efefef
Copy and paste Element 43 as a new layer.
Using the Good Dog font type Cottontails
Trail and position over the arrow – see my tag for reference.
Merge Visible the font and element layer.
Move into position – see my tag for reference.
Add your elements. I used:
65
23: Resize 25%/Duplicate/Use
your Pick Tool to rotate one of them slightly
57: Resize 60%
3: Resize 60%/Free rotate Right
10 degrees
70: Resize 70%
74: Resize 45%/Free rotate Left
15 degrees
75: Resize 45%/Free rotate Right
15 degrees
56: (position in front of frame
at bottom) Resize 40%/Duplicate/Mirror
55: (position in front of frame at bottom) Resize
40%/Duplicate/Mirror/Duplicate/Mirror/Resize 70%
56: (position behind the frame
at the top) Resize 50%/Duplicate/Mirror
55: (position in behind the frame at the top) Resize
50%/Duplicate/Mirror/Duplicate/Mirror/Resize 70%
40: Resize 25%/Free rotate Left
55 degrees
38: Resize 25%/Free rotate Right
35 degrees
4: Resize 25%
Highlight your white background.
Select All.
New Raster layer.
Copy and paste Paper 1 Into Selection.
Deselect.
Apply the mask.
Resize 105%
Merge Group.
Highlight your white background.
Merge Visible.
Reopen your white background.
Move the merged layer down slightly on your canvas – see my tag for
reference.
Copy and paste 78 as a new layer.
Resize 90%
Move into position at the top of your canvas – see my tag for
reference.
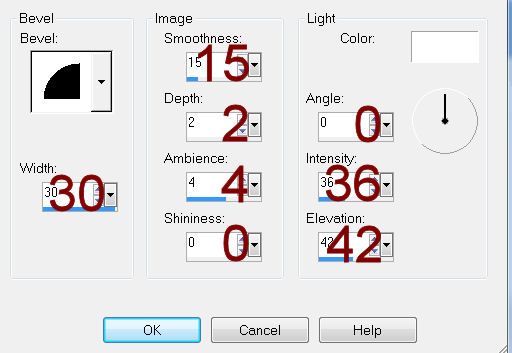
Give it a slight Inner Bevel:
Apply DSB Flux – Bright Noise:
Intensity: 40
Mix checked
OK
Select All/Float/Defloat
Selections/Modify/Expand by 2.
New Raster layer below the word art.
Flood fill with #ffffff
Deselect.
Highlight the word art layer.
Merge Down.
Add your credits.
Add your name.
Color Pallet:
Foreground and Background:
Pattern/Paper 12
Type your name.
Give it the same slight Inner Bevel.
Select All/Float/Defloat
Selections/Modify/Expand by 2.
New Raster layer below the word art.
Flood fill with #ffffff
Deselect.
Highlight the pink name layer.
Merge Down.
Resize all layers 70%.
No comments:
Post a Comment